As of 1/1/26
Welcome!
This is the official documentation for the EVAC Control application
by Slender Tech Solutions, a division of Slender Studios. In this
documentation, you will find knowledge pertaining to what EVAC Control
is and how to use it.
What is EVAC Control?
EVAC Control is an
application developed by Slender Tech Solutions that aims to enable fire alarm
and electronics hobbyists to run DIY EVAC (emergency voice alarm communication)
and PA (public address) setups with the power and convenience of their x86
computer. It interfaces with popular digital mixing software Voicemeeter,
by VB-Audio, to bring professional-grade features found in commercial EVAC and
PA systems such as remote paging, background music channel management, and
conditional mass notification tone and message mapping into the hands of
consumers with basic computer, audio, and electronics knowledge. For more
information about downloading EVAC Control, please visit https://sts.slenderstudios.com/resources/apps.htm.
Getting Started with Using EVAC Control
After hearing about EVAC
Control�s capabilities, you might be interested in using it with your
hobbyist EVAC/PA system. But before you can do so, there are some hardware and
software requirements to consider.
Hardware & Operating System Requirements to Run & Use EVAC Control
In order to run EVAC Control you must have
administrator access to a computer with a 64-bit x86 CPU running Microsoft Windows
version 10 or newer.
General Software Requirements
Voicemeeter
As previously stated, EVAC Control interfaces with
popular digital mixing software Voicemeeter via the Voicemeeter
Remote API to facilitate many of its EVAC and PA features. Voicemeeter Banana
and Potato are both available for free download under a donationware
license at https://vb-audio.com/Voicemeeter/banana.htm
and https://vb-audio.com/Voicemeeter/potato.htm
respectively. Standard Voicemeeter (i.e an edition or version that is
not Banana or Potato) will not allow EVAC Control
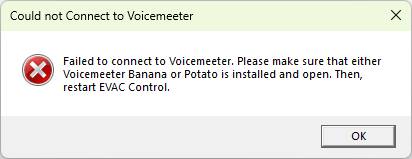
to function properly. If Voicemeeter Banana or Potato is not
executed and running on your system prior to starting EVAC Control, EVAC
Control will not be able to connect to Voicemeeter, will
subsequently display an error message, and will be forced to close:
Microsoft .NET 8 Desktop Runtime
Another piece of software that is required for EVAC Control
to run on your system and function as intended is the Microsoft .NET 8
Desktop Runtime. EVAC Control is written in .NET C#, so it requires
this runtime to be installed on your computer. To download and install the
desktop runtime, please visit https://dotnet.microsoft.com/en-us/download/dotnet/8.0,
scroll down to the section titled �.NET Desktop Runtime 8.X.X�, and click the
URL to download the x64 executable setup file. Run the downloaded file and
follow all instructions as necessary.
FACP Connect
For EVAC functionality to truly be utilized within EVAC
Control, a companion app developed by Slender Tech Solutions called FACP
Connect is available for download from https://sts.slenderstudios.com/resources/apps.htm.
Though the companion app is not technically required for EVAC Control to
operate, there will be no way to activate alarm conditions in EVAC Control
and it will therefore function only as a basic public address and BGM
(background music) control interface in conjunction with the functionality of Voicemeeter.
Interfacing and/or communicating with a fire alarm control panel or other type
of emergency system panel will also not be possible without the companion app.
The companion app will attempt to connect to EVAC Control on application
start up, so it should be executed after EVAC Control has fully
initialized and connected to Voicemeeter. Separate documentation
regarding FACP Connect is available on the Slender Tech Solutions
website at https://sts.slenderstudios.com/resources/docs.htm.
Downloading & Installing EVAC Connect
EVAC Control is available for download from the
Slender Tech Solutions website at https://sts.slenderstudios.com/resources/apps.htm.
In the left-most column of that webpage, scroll down until you see a green
download button and click it to download the setup executable for EVAC
Control. If the setup file is reported by your browser or Windows
SmartScreen to be malicious, choose to keep the file and/or run the file
regardless. If you do not choose to do this, the file may be deleted and you
will not be able to install EVAC Control on your computer. EVAC
Control is developed and maintained by Connor Bosler, also the creator of
Slender Studios, the Slender Tech YouTube channel, the Slender Tech Solutions
website, all files downloadable from it, and this documentation. He (I)
maintain(s) these projects free of charge and for the betterment of the fire
alarm and emergency alert systems community. None of the files downloadable
from sts.slenderstudios.com will ever be malicious. Once the setup executable
is downloaded to your computer, run it and follow all instructions as
necessary. This will install EVAC Control successfully.
How to Use EVAC Control


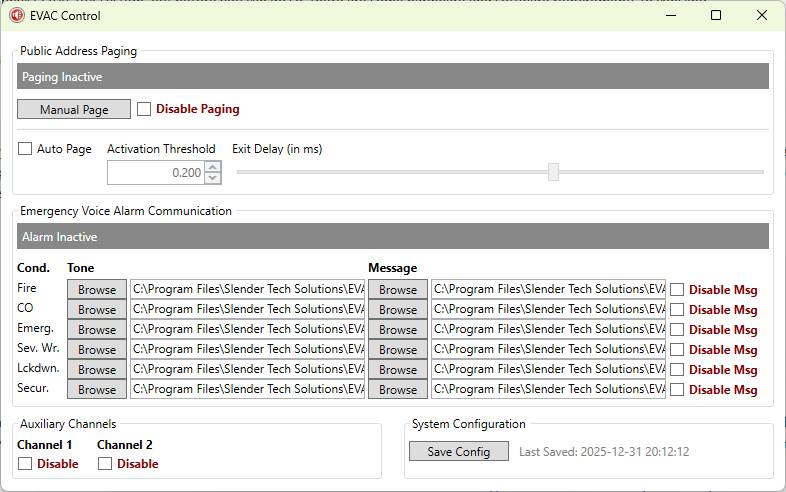
Above is a marked-up screenshot
of the main window/interface of EVAC Control.
Interface & Functionality Overview
Section A: Public Address Paging
Public address paging is used to broadcast voice
announcements from one or more microphones in an audio distribution system to
all or certain speaker zones in an audio distribution system.
1. Paging
Indicator: when paging, this indicator will turn green and display the text,
�PAGING ACTIVE�
2. Manual
Page Button: functions identically to an all-call button on a commercial
EVAC panel; when pressed and held, the application initiates a page, analog
input strip 0 (in Voicemeeter) is unmuted, and audio from that strip is
broadcasted over applicable speaker circuits (determined by Voicemeeter configuration,
see How to Use Voicemeeter); aux channels 1 () and 2 as well as
the digital cassette (EVAC message and tone player) in Voicemeeter are
muted; when released, the active page is cancelled
3. Disable
Paging Checkbox: deactivates auto page, disables pressing the Manual Page
Button, and mutes analog input strip 0 (in Voicemeeter); reverses those
actions once unchecked
4. Auto
Page Checkbox: when checked, Enables auto page/remote page; enables
Activation Threshold and Exit Delay settings; Unmutes analog input strip 0 and when
audio with a volume above or equal to the Activation threshold is detected on
that strip, mutes aux channels 1 and 2 as well as the digital cassette (in Voicemeeter;
EVAC message and tone player); when audio is longer detected on analog input
strip 0, the duration set by the Exit Delay setting is waited and then the digital
cassette is unmuted and all aux channels are unmuted unless the channel is
disabled; when unchecked, cancels any active pages and re-mutes analog input
channel strip 0.
5. Activation
Threshold: only works is auto page is enabled; a set level that will
trigger actions performed by the auto page feature once audio above or equal to
that level is detected in analog input strip 0
6. Exit
Delay Slider: only works is auto page is enabled; a set value ranging from
0�5000 milliseconds that is waited after audio above or equal to that level is
no longer detected in analog input strip 0; after the waiting is complete,
certain actions performed by the auto page feature are reversed
Section B: Emergency Voice Alarm Communication
Emergency voice alarm communication is a form of mass
notification that utilizes speakers and audio signals in place of fire alarm
horns, sirens, or other non-speaker notification appliances. This allows for
evacuation instructions, whether prerecorded messages or live pages, to be
delivered directly to occupants of a building via audio when an emergency is to
occur.
1. Alarm
Condition Indicator: when an alarm condition is triggered by a third-party
electronics system connected to EVAC Control via FACP Connect, this
indicator will turn red and display the text, �ALARM ACTIVE�
2. Condition
Column: Lists various types of emergency/alarm conditions that can be
triggered by a third-party electronics system connected to EVAC Control
via FACP Connect; condition names will flash when an alarm signal is
received pertaining to them; some condition names are abbreviated�CO stands for
�Carbon Monoxide�, Emerg. is an abbreviation for �Emergency�, Sev. Wr. is an
abbreviation for �Severe Weather�, Lckdwn. is an abbreviation for �Lockdown�,
Secur. is an abbreviation for �Security�
3. Tone
Column: A column containing rows of a button and textbox for each alarm
condition listed in the Condition Column that can utilized to change the tone
played over the audio distribution system when a certain condition is
triggered; a browse button, when pressed, allows any .wav, .mp3, .flac, .aac, .ogg, or .wma file to be selected to be
used as this tone; the system path of the file chosen is displayed in the
textbox to the button�s right
4. Message
Column: A column containing rows of a button and textbox for each alarm
condition listed in the Condition Column that can be utilized to change the
message played over the audio distribution system when a certain condition is
triggered (unless the condition�s message is disabled); a browse button, when
pressed, allows any .wav, .mp3, .flac, .aac,
.ogg, or .wma file to be selected to be used as this message; the system
path of the file chosen is displayed in the textbox to the button�s right
5. Disable
Message Checkboxes: checkboxes to disable messages from being played when
selected alarm conditions are triggered; when a checkbox is checked for a
particular condition, only that condition�s tone will play over the audio
distribution system when it is triggered; once unchecked, that behavior is
undone, and both the message and tone will play when the condition is triggered
Section C: Auxiliary Channels
Aux channels can be utilized to play anything at all over
the PA/EVAC system, but are generally utilized to pipe-in BGM from the output of
a CD player, MP3 player, or other device.
1. Disable
Aux Channel 1 Checkbox: when checked, mutes analog input strip 1 (in Voicemeeter)
and prevents it from being unmuted by other features within EVAC Control;
when unchecked, those actions are undone
2. Disable
Aux Channel 2 Checkbox: when checked, mutes analog input strip 2 (in Voicemeeter)
and prevents it from being unmuted by other features within EVAC Control;
when unchecked, those actions are undone
Section D: Application/System Configuration
This section is utilized to capture all current settings
available in EVAC Control and save their current configurations to a
.JSON file at the system path "%USERPROFILE%\AppData\Local\EVACControl\sysconfig.json".
This file is reloaded as is every time EVAC Control starts up.
Application and settings within EVAC Control do not auto-save,
so make sure to press the Save Config Button whenever you make a change to any
setting.
1. Save
Config Button: when pressed, captures all current settings available in EVAC
Control and saves them in their current configurations at the time of the
button press to a .JSON file at the system path "%USERPROFILE%\AppData\Local\EVACControl\sysconfig.json"
2. Save
Configuration Timestamp: When the Save Config Button is pressed, a the current
system timestamp is saved within the sysconfig.json file; this timestamp is
displayed next to the Save Config Button as a note of when EVAC Control
application configuration was last saved to the system hard drive
In the Event of an Alarm Condition
When any alarm condition is triggered in EVAC Control by
a third-party electronics system connected to EVAC Control via FACP
Connect, a sequence of events is set into motion:
�
Both Auxiliary analog input channels 1 and 2 (in Voicemeeter)
are muted whether enabled or disabled
�
An audio file containing either a tone or a tone and prerecorded
message (depending upon EVAC Control configuration for the particular
alarm condition trigger) is loaded into Voicemeeter�s digital cassette (see
How to Use Voicemeeter)
If a second alarm condition triggers, the current message
and/or tone corresponding to the original emergency condition registered will
not stop playing; no new audio files, messages, or tones will be loaded or
played in the cassette until the original or oldest emergency condition has
cleared/been silenced by the external electronics system.
Once all alarm conditions are cleared, all audio files are
ejected from the cassette and aux channels 1 and/or 2 are either unmuted if
they are not disabled or remain muted if they are.
As previously stated, EVAC Control interfaces with popular
digital mixing software Voicemeeter via the Voicemeeter Remote API to
facilitate many of its EVAC and PA features. Only Voicemeeter Banana and
Potato are compatible with EVAC Control. Further documentation
regarding Voicemeeter than what is below is available in the Voicemeeter
Banana and Potato
manuals. In order for both applications to connect with each other, Voicemeeter
must executed and running prior to launching EVAC Control.


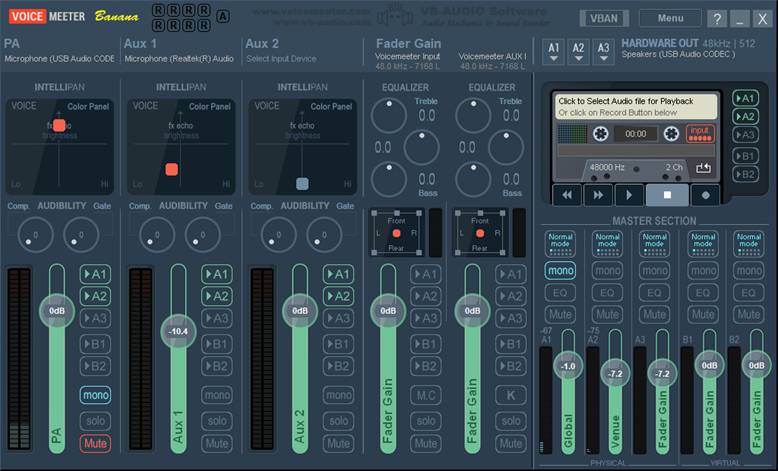
Above is a marked-up screenshot
of the main window/interface of Voicemeeter Banana. Voicemeeter
Potato simply features input and output strips.
1.
R-Boxes: when EVAC Control has started up and connected to
Voicemeeter successfully, one of the eight R-Boxes pictured will
�light-up� blue. If EVAC Control is closed, the R-Box will return to
being black
2.
Analog Output Strips A1, A2, & A3: using these buttons, up to
three separate audio interfaces on three separate channels/strips can be set to
output audio from the mixer to the amplifier of your audio distribution system
a. Gain
Adjustment for Analog Output Strips A1, A2, & A3: each slider will
raise or lower the gain of the audio sent to an interface on strip A1, A2, or
A3 respectively
b. Mute
Buttons for Analog Output Strips A1, A2, & A3: these buttons will mute
their corresponding output channels/strips
c. Equalization
for Analog Output Strips A1, A2, & A3: when left-clicked, these buttons
will enable/disable EQ adjustment on their corresponding output strips; when
right-clicked, a six-band equalizer will be displayed in a separate window
allowing manual adjustment of the equalization applied to its each respective
strip
d. Mono
Buttons for Analog Output Strips A1, A2, & A3: when clicked, these
buttons will merge (make mono) or unmerge (make stereo) the individual left and
right channels of their corresponding output strip
3.
Analog Input Strips 0, 1, & 2: clicking on these titles will
display a separate window for each analog input strip where up to three
individual devices can be selected as audio inputs for the mixer; when starting
up EVAC Control strip 0 will be named �PA�, strip 1 will be named �Aux
1�, and strip 2 will be named �Aux 2�; these names correspond to the function
of each strip within EVAC Control; for example, pressing the page button
in EVAC Control will toggle mute for strip 0, expecting that a
microphone of some kind would be connected to that input strip rather than 1 or
2; these default strip function assignments cannot be changed or configured in EVAC
Control
a. Gain
Adjustment for Analog Input Strips 0, 1, & 2: each slider will raise or
lower the gain of the audio received from its respective input device on either
strip 0, 1, or 2
b. Channel
Output Selector Buttons for Analog Input Strips 0, 1, & 2: pressing
each button will activate or deactivate sending audio from input 0, 1, or 2 to
any of the three audio outputs A1, A2, and/or A3
c. Mute
Buttons for Analog Input Strips 0, 1, & 2: these buttons will mute
their corresponding input channels/strips
d. Mono
Buttons for Analog Input Strips 0, 1, & 2: when clicked, these buttons
will merge (make mono) or unmerge (make stereo) the individual left and right
channels of their corresponding input strip
e. INTELLIPAN
for Analog Input Strips 0, 1, & 2: these panels feature a square slider
that is red in color if it has been moved from its default position and gray in
color if it has not been moved; though there are three effects panels in total
that can be cycled through by right-clicking on each panel, the most useful is
the �Color Panel�; in this panel you can move the square slider around to
adjust the brightness and tone of an audio input strip, similar to a limited equalizer
4.
Digital Cassette: essentially a mini audio player; it is utilized
by EVAC Control to play tones and messages selected by the user (or the
default ones) in the Tone and Message columns of the EVAC section EVAC
Control to the analog output strips A1, A2, and A3; Do not use
the cassette�s recording functionality or either Voicemeeter or EVAC
Control may malfunction when EVAC Control attempts to load audio
files into the cassette in the event of an alarm or emergency condition
a. Channel
Output Selector Buttons for Digital Cassette: pressing each button will
activate or deactivate sending audio from the cassette to any of the three
audio outputs A1, A2, and/or A3; it is not recommended to disable output to all
analog output strips or emergency voice alarm communication evacuation tones
and instructions will not be heard over the audio distribution system.
Feedback & Tutorials
Have any questions, comments, concerns, or suggestions
regarding EVAC Control? Submit them to the EVAC Control YouTrack
project at https://slenderstudios.youtrack.cloud/newIssue.
If you aren�t comfortable using YouTrack, you can always contact us directly
using our email address: [email protected].
If you are looking for tutorials on setting up your own
audio distribution or mass notification system, please visit https://sts.slenderstudios.com/resources/tuts.htm.